Imagine cruising down the road, feeling the wind in your hair, and then… you slam on the brakes. But instead of a reassuring stop, you get a squishy pedal and a heart-stopping moment of delayed reaction. That's a scenario nobody wants to experience, and often, it can be avoided with regular brake fluid maintenance.
Let's face it, car maintenance can be a daunting prospect. The thought of fiddling with complex systems, dealing with potentially messy fluids, and the lingering fear of making a costly mistake can keep many drivers from tackling even the simplest tasks. Plus, finding reliable information that's easy to understand and follow can feel like searching for a needle in a haystack.
This guide is designed to empower you to safely and effectively change your car's brake fluid. We'll break down the process into easy-to-follow steps, providing clear instructions and helpful tips along the way. By the end of this article, you'll have the knowledge and confidence to perform this essential maintenance task yourself, saving money and ensuring your brakes are in top condition.
In this guide, we'll walk through everything from gathering the necessary tools and understanding the different types of brake fluid, to the step-by-step procedure for bleeding your brakes and safely disposing of the old fluid. We'll also cover some common issues and troubleshooting tips to help you avoid potential problems. Mastering this simple maintenance task will not only save you money, but most importantly, it will ensure your safety and the safety of others on the road. So, let's dive in and get those brakes working perfectly!
Why Changing Your Brake Fluid Matters: A Personal Anecdote
I'll never forget the time I neglected my brake fluid for far too long. I was driving through the mountains, enjoying the scenic views, when I noticed the brakes feeling a little… soft. I didn't think much of it at first, chalking it up to the winding roads. But as the descent became steeper, the pedal got squishier, and the stopping power diminished significantly. Panic started to set in. I had to pump the brakes repeatedly to maintain control, and it was a truly terrifying experience. Thankfully, I made it down safely, but it was a wake-up call. I immediately checked the brake fluid, and it was a murky brown color, a far cry from the clear amber it should have been. The moisture it had absorbed over time had severely compromised its performance. From that day on, I became a firm believer in regular brake fluid changes.
The reason brake fluid changes are so important is that brake fluid is hygroscopic, meaning it absorbs moisture from the air. Over time, this moisture contaminates the fluid, lowering its boiling point. When you brake, the friction generates heat, which can cause the moisture in the fluid to boil, creating vapor bubbles. These bubbles compress easily, reducing the hydraulic pressure in the braking system and leading to a soft or spongy brake pedal. This is brake fade, and it can be incredibly dangerous, especially in emergency situations. Regular brake fluid changes remove this contaminated fluid, replacing it with fresh fluid that can withstand the heat and maintain optimal braking performance. Using a brake fluid tester can give you insight as to the condition of your brake fluid.
Understanding Brake Fluid Types
Choosing the right brake fluid for your vehicle is crucial. Using the wrong type can damage your braking system and compromise its performance. The most common types of brake fluid are DOT 3, DOT 4, and DOT 5.1. DOT 3 and DOT 4 are glycol-based fluids, while DOT 5 is silicone-based.
DOT 3 is the most basic type and is commonly found in older vehicles. DOT 4 has a higher boiling point than DOT 3, making it suitable for vehicles with more demanding braking systems, such as those with ABS. DOT 5.1 also has a high boiling point and is compatible with ABS systems, but it's important to note that it should never be mixed with DOT 3 or DOT 4 fluids. Mixing glycol-based and silicone-based fluids can cause serious damage to your braking system.
Always consult your vehicle's owner's manual to determine the correct type of brake fluid to use. If you're unsure, it's always best to err on the side of caution and use the fluid recommended by the manufacturer. Never use DOT 5 unless your vehicle specifically calls for it. When purchasing brake fluid, make sure it's from a reputable brand and that the container is sealed. Avoid using brake fluid that has been sitting open for a long time, as it may have already absorbed moisture from the air.
The History and Myths of Brake Fluid
The history of brake fluid is intertwined with the evolution of the automobile itself. Early cars relied on mechanical brakes, which were often unreliable and ineffective. As vehicles became faster and heavier, the need for a more efficient braking system became apparent. Hydraulic brakes, which use fluid to transmit force from the brake pedal to the wheels, were a major breakthrough.
The first hydraulic brake systems used mineral oil as the fluid, but it had several drawbacks, including its tendency to swell rubber components and its low boiling point. Glycol-based brake fluids, such as DOT 3 and DOT 4, were developed to overcome these limitations. These fluids offered better performance and compatibility with modern braking systems.
One common myth about brake fluid is that it never needs to be changed unless there's a problem. This is simply not true. As we discussed earlier, brake fluid absorbs moisture over time, which can significantly reduce its performance. Regular brake fluid changes are essential for maintaining optimal braking performance and preventing costly repairs. Another myth is that all brake fluids are the same. This is also false. Different types of brake fluid have different properties, and using the wrong type can damage your braking system. Always use the fluid recommended by your vehicle's manufacturer.
The Hidden Secret to Effective Brake Bleeding
The real secret to effective brake bleeding isn't just about the tools or the technique, it's about patience and attention to detail. Many DIYers rush through the process, only to find themselves with a spongy brake pedal. The key is to take your time and ensure that all air bubbles are completely purged from the system.
One often-overlooked aspect is the order in which you bleed the brakes. Generally, you should start with the wheel farthest from the master cylinder and work your way closer. This helps to push any air bubbles towards the furthest point, making them easier to remove. However, some vehicles may have a different recommended bleeding sequence, so it's always a good idea to consult your vehicle's service manual.
Another important tip is to keep the brake fluid reservoir topped up throughout the process. If the reservoir runs dry, you'll introduce air into the system, which will undo all your hard work. It's also crucial to use a clear tube when bleeding the brakes so you can easily see when the fluid is free of air bubbles. Finally, don't forget to properly dispose of the old brake fluid. It's considered hazardous waste and should not be poured down the drain or into the ground.
Expert Recommendations for Brake Fluid Maintenance
When it comes to brake fluid maintenance, professional mechanics often recommend a few key practices. First, they emphasize the importance of using a high-quality brake fluid from a reputable brand. While it may be tempting to save money by buying a cheaper fluid, the long-term cost of using a substandard product can be much higher.
Second, mechanics recommend flushing the entire braking system, not just bleeding the brakes. Flushing involves replacing all the old fluid with fresh fluid, which helps to remove any contaminants or debris that may have accumulated in the lines and calipers. This is especially important if you've noticed that your brake fluid is heavily contaminated or if you're experiencing braking problems.
Finally, professionals advise against reusing old brake fluid. Even if the fluid looks clean, it may still contain moisture and contaminants that can compromise its performance. It's always best to use fresh fluid from a sealed container. By following these expert recommendations, you can ensure that your braking system is in top condition and that your brakes are performing at their best.
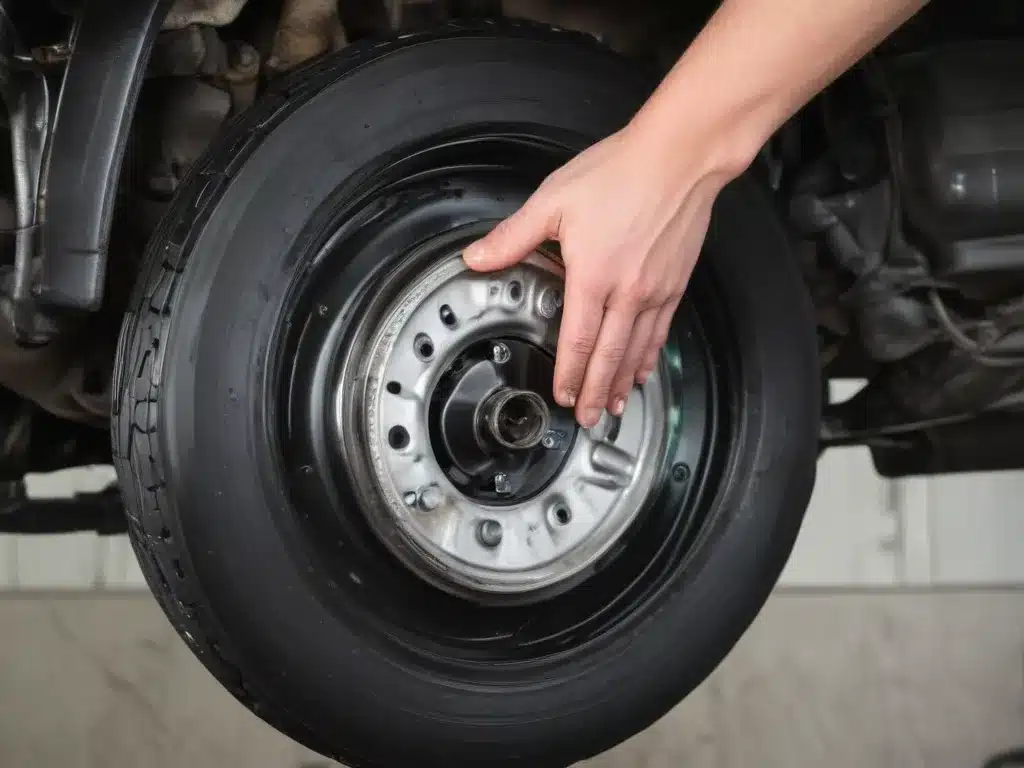
Step-by-Step Guide to Changing Your Brake Fluid
Now, let's get down to the nitty-gritty of changing your brake fluid. Here's a step-by-step guide to help you through the process:
- Gather your supplies: You'll need the correct type of brake fluid for your vehicle, a wrench to open the bleeder screws, a clear plastic tube that fits snugly over the bleeder screws, a container to catch the old fluid, a turkey baster or syringe to remove old fluid from the reservoir, gloves, and safety glasses.
- Prepare your vehicle: Park your car on a level surface, engage the parking brake, and chock the wheels. Locate the brake fluid reservoir, usually under the hood near the master cylinder.
- Remove old fluid from the reservoir: Use the turkey baster or syringe to remove as much of the old fluid from the reservoir as possible. Discard the old fluid properly.
- Add fresh brake fluid to the reservoir: Fill the reservoir with fresh brake fluid to the "max" line.
- Locate the bleeder screws: Each brake caliper has a bleeder screw, usually covered with a rubber cap. Remove the cap and attach the plastic tube to the bleeder screw.
- Open the bleeder screw: Have a helper pump the brake pedal several times and hold it down. While the pedal is down, open the bleeder screw slightly. Old fluid will flow into the container.
- Close the bleeder screw: Before your helper releases the brake pedal, close the bleeder screw tightly.
- Repeat the process: Repeat steps 6 and 7 until the fluid flowing through the tube is clear and free of air bubbles.
- Move to the next wheel: Repeat the process for each wheel, starting with the wheel farthest from the master cylinder and working your way closer.
- Top off the reservoir: After bleeding all four brakes, top off the brake fluid reservoir to the "max" line.
- Test your brakes: Pump the brake pedal several times to ensure it feels firm. Take your car for a short test drive and check that the brakes are working properly.
Essential Tips for a Smooth Brake Fluid Change
Here are some invaluable tips to ensure a smooth and successful brake fluid change:
- Use the correct tools: Make sure you have the right size wrench for the bleeder screws. Using the wrong size can damage the screws and make them difficult to open.
- Don't overtighten the bleeder screws: Overtightening the bleeder screws can damage them or strip the threads. Tighten them just enough to seal them.
- Prevent spills: Brake fluid can damage paint and other surfaces, so be careful to avoid spills. If you do spill any fluid, wipe it up immediately with a damp cloth.
- Check for leaks: After bleeding the brakes, check for leaks around the bleeder screws and brake lines. If you find any leaks, tighten the connections or replace the damaged parts.
- Dispose of old fluid properly: Old brake fluid is considered hazardous waste and should be disposed of properly. Check with your local waste management authority for instructions on how to dispose of it safely.
- Consider a pressure bleeder: If you're having trouble bleeding the brakes using the manual method, consider using a pressure bleeder. These devices use compressed air to push fluid through the system, making it easier to remove air bubbles.
Troubleshooting Common Issues
Sometimes, even with the best intentions, things can go wrong. Here are some common issues you might encounter when changing your brake fluid and how to troubleshoot them:
- Bleeder screw is stuck: If a bleeder screw is stuck, try spraying it with penetrating oil and letting it soak for a few minutes. If that doesn't work, you may need to use a bleeder screw extractor.
- Spongy brake pedal: A spongy brake pedal is usually a sign that there's still air in the system. Double-check your work and bleed the brakes again, paying close attention to the bleeding sequence.
- Brake fluid reservoir keeps running dry: If the brake fluid reservoir is running dry quickly, it could indicate a leak in the system. Inspect the brake lines, calipers, and master cylinder for leaks.
- Brake pedal goes to the floor: If the brake pedal goes to the floor, it could be a sign of a major problem, such as a leak in the brake lines or a faulty master cylinder. Have your brakes inspected by a professional mechanic immediately.
Fun Facts About Brake Fluid
Did you know that brake fluid can actually damage your car's paint? It's true! Brake fluid is highly corrosive and can eat away at paint, rubber, and plastic. That's why it's so important to be careful when handling it and to clean up any spills immediately.
Another interesting fact is that brake fluid has a limited shelf life. Even if you haven't opened the container, brake fluid can degrade over time, so it's best to use it within a year or two of purchase. Always check the expiration date on the container before using it.
Finally, the color of brake fluid can give you a clue about its condition. Fresh brake fluid is typically clear or amber in color. As it absorbs moisture and contaminants, it can turn darker, eventually becoming brown or black. If your brake fluid is dark, it's definitely time for a change!
How to Know When It's Time to Change Your Brake Fluid
Knowing when to change your brake fluid is crucial for maintaining optimal braking performance and preventing costly repairs. While your vehicle's owner's manual may provide a recommended interval, there are other factors to consider as well. One of the most reliable indicators is the appearance of the fluid itself. As we mentioned earlier, brake fluid darkens over time as it absorbs moisture and contaminants.
Another sign that it's time to change your brake fluid is a spongy or soft brake pedal. This can indicate that there's air in the system or that the fluid has absorbed too much moisture. You can also use a brake fluid tester to check the moisture content of the fluid. These testers are relatively inexpensive and easy to use, and they can give you a precise reading of the fluid's condition. If the tester indicates that the moisture content is above 3%, it's time to change the fluid.
As a general rule of thumb, it's a good idea to change your brake fluid every two years or 30,000 miles, whichever comes first. However, if you drive in a humid climate or do a lot of heavy braking, you may need to change it more frequently. Regular inspections and testing can help you determine the best interval for your vehicle.
What Happens If You Don't Change Your Brake Fluid?
Neglecting to change your brake fluid can have serious consequences for your vehicle's braking system and your safety. As we've discussed, brake fluid absorbs moisture over time, which lowers its boiling point and reduces its ability to transmit hydraulic pressure. This can lead to a soft or spongy brake pedal, reduced stopping power, and even brake failure.
In addition to compromising braking performance, contaminated brake fluid can also damage the components of your braking system. The moisture in the fluid can corrode the brake lines, calipers, and master cylinder, leading to costly repairs. Over time, the corrosion can cause leaks, which can further reduce braking performance and increase the risk of accidents.
Furthermore, old brake fluid can damage the ABS (Anti-lock Braking System) components. The ABS system is designed to prevent wheel lockup during braking, but it relies on clean, high-performance brake fluid to function properly. Contaminated fluid can clog the ABS valves and sensors, causing the system to malfunction or fail altogether. In short, neglecting to change your brake fluid can compromise your safety and lead to expensive repairs. Regular maintenance is the key to keeping your braking system in top condition.
Top 5 Reasons to DIY Your Brake Fluid Change
- Save Money: Paying a mechanic to change your brake fluid can cost a significant amount of money, especially if you have to take your car in regularly. Doing it yourself can save you a considerable amount of money over time.
- Gain Knowledge: Changing your brake fluid yourself can help you learn more about your car and how it works. This knowledge can be valuable for future maintenance and repairs.
- Ensure Quality: When you change your brake fluid yourself, you have control over the quality of the fluid and the way the job is done. You can be sure that you're using the right fluid and that the job is done correctly.
- Convenience: Changing your brake fluid yourself can be done at your convenience, without having to schedule an appointment or wait for your car to be serviced.
- Peace of Mind: Knowing that you've taken care of your car's maintenance needs yourself can give you peace of mind and a sense of accomplishment.
Question and Answer about DIY Guide: How to Properly Change Your Car's Brake Fluid for Safety
Q: How often should I change my brake fluid?
A: It's generally recommended to change your brake fluid every two years or 30,000 miles, whichever comes first. However, you should also check your owner's manual for specific recommendations and consider factors such as driving conditions and brake fluid condition.
Q: Can I use any type of brake fluid in my car?
A: No, it's crucial to use the correct type of brake fluid for your vehicle. Check your owner's manual or consult with a mechanic to determine the appropriate type. Using the wrong type of fluid can damage your braking system.
Q: What are the signs that my brake fluid needs to be changed?
A: Signs include a spongy or soft brake pedal, dark or contaminated brake fluid, and a high moisture content as measured by a brake fluid tester.
Q: Is it difficult to change brake fluid myself?
A: Changing brake fluid is a relatively straightforward process, but it requires some mechanical knowledge and attention to detail. With the right tools and instructions, most DIYers can successfully change their brake fluid.
Conclusion of DIY Guide: How to Properly Change Your Car's Brake Fluid for Safety
Changing your brake fluid is a vital part of car maintenance that shouldn't be overlooked. By following the steps and tips outlined in this guide, you can confidently perform this task yourself, saving money and ensuring your brakes are in optimal condition. Remember to use the correct type of brake fluid, take your time, and pay attention to detail. Regular brake fluid changes will not only improve your braking performance but also extend the life of your braking system and, most importantly, enhance your safety on the road. So, roll up your sleeves, grab your tools, and get ready to give your brakes the attention they deserve!